How To Train Your Deep Learning Models Faster
Photo by Marc-Olivier Jodoin on Unsplash
Deep learning is a subset of machine learning that utilizes neural networks in “deep” architectures, or multiple layers, to extract information from data. Early neural networks employed relatively simple (or “shallow”) architectures, but today’s deep learning neural networks can be incredibly complex.
Neural networks are designed to work much like human brains and are comprised of individual neurons that resemble the structure of a biological neuron. A neuron receives input from other neurons, performs some algorithmic processing on it, and generates an output (which may or may not be fed into yet another neuron as input). Neural networks are therefore a combination of a series of algorithms that ultimately recognize underlying relationships and patterns in the data. In short, a neural network is an interconnected arrangement of mathematical functions.
In 1957, the first neural network, called a Perceptron, was developed by Frank Rosenblatt. It was similar to modern-day neural networks, except in that it only had one hidden layer, as well as configurable weights and biases. Now, many decades later, multi-layer neural networks are widely used for solving incredibly complex problems.
Training a multilayer neural network entails much more than just creating connections between neurons, however. It can be a prohibitively lengthy iterative process, and often requires additional computational power that many do not have access to on their home computers.
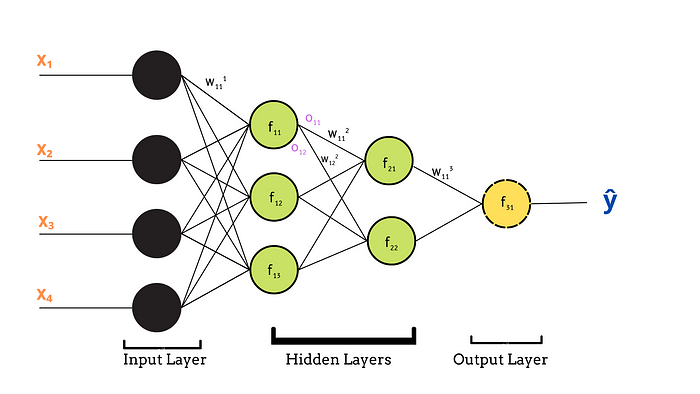
 Multilayer Neural Network — Image Created By Author Using
Training a deep learning neural network can take days, or even weeks, or more! However, there are some methods that we can use to train models faster, and we’ll discuss a few of them in this article.
It can takes days, or even weeks, to train a DL neural network, but the use of transfer learning, optimizers, early stopping, and GPUs can speed up this process significantly.
Selecting the right optimizer
Optimization algorithms are responsible for reducing the loss, and increasing the evaluation metric (often, accuracy), of your deep learning model by controlling the learning rate. Training time depends largely on how quickly your model can learn optimal weights for your network, so selecting the right optimization method can reduce training time exponentially.
There are many optimizers to choose from, including Gradient Descent, Momentum, Mini Batch Gradient Descent, Nesterov Accelerated Gradient, AdaGrad, RMSProp, and more. Many of these optimizers are mathematically complex, and even many experts in the field don’t know all the details of all the optimization algorithms. One pragmatic approach is to choose a versatile algorithm and use that for most problems. And for this, the Adam optimizer is an excellent go-to option. It performs exceedingly well on a wide range of applications and compares favorably to other stochastic optimization methods.
The Adam optimizer adjusts the learning rate as it performs gradient descent to ensure reasonable values throughout the weight optimization process. This flexibility allows Adam to increase the learning rate where appropriate (speeding up the training process and avoiding local minima) and decrease the learning rate when approaching the global minimum.
# Initializing the Adam optimizer
import tensorflow as tfadam = tf.keras.optimizers.Adam(
    learning_rate=0.001,
    beta_1=0.9,
    beta_2=0.999,
    epsilon=1e-07,
    amsgrad=False,
    name='adam',
    **kwargs
)
learning_rate: floating-point value or a tf.keras.optimizers.schedules.LearningRateSchedulescheduled value; defaults to 0.001.
beta_1: The exponential decay rate for the 1st-moment estimate; defaults to 0.9.
beta_2: The exponential decay rate for the 2nd-moment estimate; defaults to 0.999.
name: Optional name for the operations created when applying gradients. Defaults to Adam.
epsilon: A small constant for numerical stability; defaults to 1e-7.
amsgrad: Boolean; whether to apply the AMSGrad variant of this algorithm.
You can learn about different optimizers in more detail here.
# Configuring the model for training
import tensorflow as tf
import kerasaccuracy = tf.keras.metrics.Accuracy()
adam = tf.keras.optimizers.Adam()model.compile(
  loss='binary_crossentropy',
  optimizer= adam,
  metrics=[accuracy]
)
Making Use of Transfer Learning
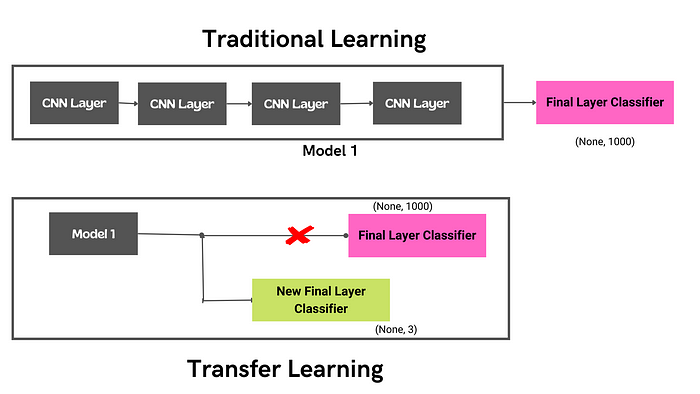
The process of transferring the knowledge gained by one model to another model is called transfer learning.
In transfer learning, we make use of a pre-trained model with pre-trained weights and freeze all the layers of that model except the final output layer. Then we replace the original output layer with our custom final layer, which includes the number of output classes we need our new model to identify.

There are many pre-trained models available in the Keras library. These models have been trained extensively for long periods of time on massive labeled datasets. By freezing all but the output layer of one of these models, we are able to utilize the patterns learned in these massive training sessions, and apply them to our own use cases. And to use one is as simple as one line of code, which downloads the pre-trained model from Keras.
from keras.layers import Dense, Flatten
from keras.models import Model
from keras.models import Sequential
from keras.applications.vgg16 import VGG16# Image Size
IMAGE_SIZE = [224, 224]# Pretrained Model
vgg = VGG16(input_shape= IMAGE_SIZE + [3], weights ='imagenet',
                include_top= False)# Freeze layers
for layer in vgg.layers:
  layer.trainable = False# Add custom output layer
x = Flatten()(vgg.output)
prediction = Dense(3, activation= 'softmax')(x)
model_1 = Model(inputs= vgg.input, outputs=prediction)# Generate Model Summary
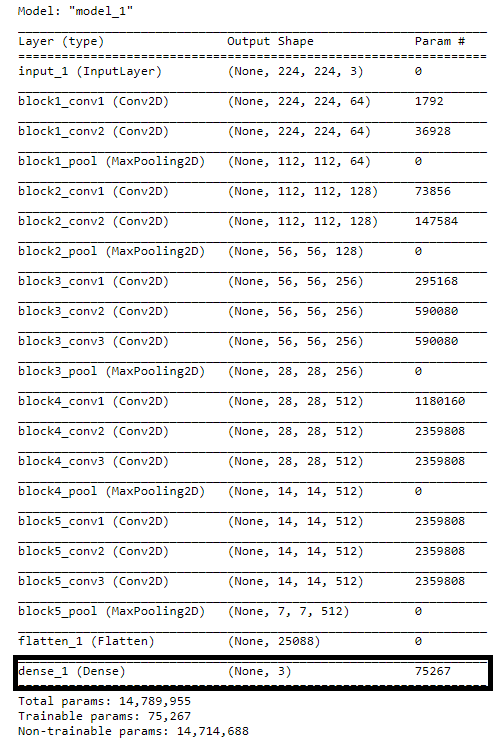
model_1.summary()

You can see that we have attached our new output layer classifying only three classes instead of 1,000.
Transfer learning can save a lot of time and resources because we don’t have to train the whole model from scratch.
Big teams rely on big ideas. Learn how experts at Uber, WorkFusion, and The RealReal use Comet to scale out their ML models and ensure visibility and collaboration company-wide.
Early Stopping
One epoch is one complete pass of training data through the neural network. During each epoch, each neuron has the opportunity to update its weights, so the more epochs you choose, the longer your training will be. Additionally, choosing too many epochs can lead to overfitting. On the other hand, choosing too few epochs can cause underfitting.
Early stopping is a form of regularization that stops the training process once model performance stops improving on the validation set. It allows significantly decreases the likelihood of overfitting the model.
Keras has a callback function designed to stop training early, once it has detected that the model is no longer making significant improvements
from tensorflow.keras.callbacks import EarlyStoppingearly_stopping = EarlyStopping(
    monitor='val_loss',
    min_delta=0,
    patience=0,
    verbose=0,
    mode='auto',
    baseline=None,
    restore_best_weights=False
)
We won’t be utilizing all of these parameters for our example, but let’s take a look at two we will use:
monitor: metric to be used as a measure for terminating the training.
patience: number of epochs with no improvement after which training gets terminated.
In the example below, we have set out model to stop training when the loss stops improving for two consecutive epochs.
from tensorflow.keras.callbacks import EarlyStoppingearly_stopping = EarlyStopping(monitor='loss', patience=2)history = model.fit(
    X_train,
    y_train,
    epochs= 100,
    validation_split= 0.20,
    batch_size= 50,
    verbose= "auto",
    callbacks= [early_stopping]
)

Early stopping will stop the neural network when it stops improving for the specified number of epochs, thus reducing the training time taken by the network.
GPUs For Training
Ultimately, no matter how much you optimize your deep learning model, if you are training it on a CPU it will take you exponentially longer that training it on a GPU. GPUs can improve the overall training process by performing multiple computations simultaneously.
There are two options through which you can access GPU power for your model. First, the cheapest option is to make use of cloud GPUs provided by big tech companies.
Google Colab is a leading GPU provider, that provides you the opportunity to easily upload your Python notebook and train a model on their virtual machines. Once all files are uploaded, you can even walk away from your computer and track the training process on your mobile phone or tablet.
Kaggle is another GPU provider that provides 30 hours per week of free GPU time.
If you’re willing to spend some big bucks on training your model, there are other platforms as well that will provide you will even more access hours to their cloud GPUs. One example is Good Cloud GPU ($300 for 850 hours).
Another expensive option is to build a high-end computer system that has at least 16GB of ram and around 8 GB of high-end graphics like Geforce RTX from Nvidia. A system like this will take a serious bite out of your pocket, though. If you are ready to invest some money, the CUDA toolkit, is definitely worth considering.
CUDA will create a path between your computer hardware and deep learning model. The NVIDIA CUDA Toolkit provides a development environment for creating high-performance GPU accelerated applications like computer games, deep learning models, etc. The NVIDIA CUDA Deep Neural Network library (cuDNN) is specially designed for training and building deep neural networks. You can read about the complete step-by-step installation process here.
GPUs can drastically increase the training speed of your deep learning models, but access to GPUs is limited, unless you have deep pockets.
Conclusion
Although training a neural network takes lots of time, with the help of optimizers, transfer learning, and access to advanced hardware, we can reduce the training time significantly, while still creating a top-notch model.


