An End-to-End Guide on Using Comet ML’s Model Versioning Feature: Part 1
The world of machine learning and data science is awash with technicalities. With each passing day, it becomes ever more evident that a practitioner in this field needs to keep track of a lot of things lest they fall into the deluge of complexity.
Fortunately, there are many workarounds to deal with many of the problems that normally arise. One problem that is particularly prevalent is model tracking. Machine learning problems could grow to such an extent that you constantly lose track of what you are doing. The direct effect of this is that it is possible to start getting deteriorating performance in models.
The fix around this is model tracking. This is keeping track and recording the changes and the performance of a given model. A model that is constantly evolving could see sharp rises in performance or declines depending on the work that is going into it. For this reason, you need to know what works best for you.
Comet ML has an intricate web of tools that combine simplicity and safety and allows one to not only track changes in their model but also deploy them as desired or shared in teams.
Workflow Overview
The typical iterative ML workflow involves preprocessing a dataset and then developing the model further. This could involve tuning hyperparameters and combining different algorithms in order to leverage their strengths and come up with a better-performing model.
On top of this, it will be critical to export and track a model after each improvement or change in order to not get lost in the complexity of this activity. There will be a few requirements for this entire workflow. They are:
- A Comet ML account
- A suitable IDE, e.g., VSCode or Jupyter Notebook which can also run in VSCode
- The latest versions of Scikit-learn, CometML, Pandas, NumPy, joblib, and XGboost libraries
- A python 3.9+ install
- A curious spirit
To install the above libraries, you can run the following in your terminal:
pip3 install comet-ml xgboost scikit-learn numpy pandas joblib
Once the above libraries are installed, then we can begin our model versioning on Comet ML’s platform.
Understanding Comet’s Model Registry
Using Comet for the first time to perform an activity like this may seem daunting at first, but in all honesty, all it requires is a slight understanding of the platform and adding a few lines of code to your workflow in order to succeed.
There are a few things you have to keep in mind when you’re trying to keep track of your models. There are three tabs on the Comet homepage; you should be keen on two. These two tabs are “Projects” and “Model Registry.”

The reason you should be keen on this is that you will first log your experiments under the “Projects” tab in a single project. After doing so, you will need the directory of that experiment within the project in order to register and upload a model to the “Model Registry” tab.
All the above may seem convoluted but it will become much clearer once we see the full end-to-end project.
Project
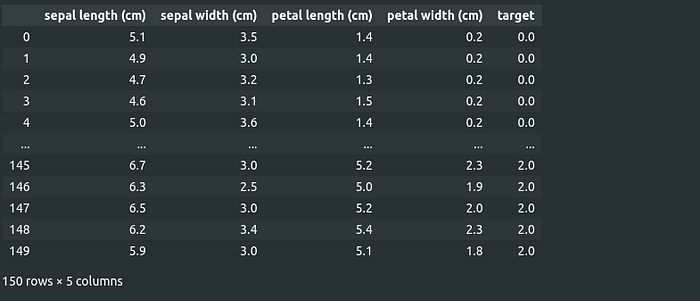
For this example, I had a simple project in mind that would demonstrate everything important. I decided it would be best to use the iris dataset because it is fairly simple and would easily allow us to see different iterations of code and track whether models are getting any better on some baseline data.
The first step is to load the dataset from the Scikit-learn library. It comes in the form of a NumPy array, so I convert it to a Pandas DataFrame to make it more comfortable to use. The first cell will look like this:
import pandas as pd
from sklearn import datasets
import numpy as np

#Taking it in as an np array
df = datasets.load_iris()

#converting it to a pandas dataframe
df = pd.DataFrame(data=np.c_[df['data'], df['target']],
                  columns= df['feature_names'] + ['target'])

df
The result is a Pandas DataFrame that looks like this:

I will skip the preprocessing steps to purely focus on the model tracking and get straight to testing the performance of different algorithms.
The next step is to define the features and labels, i.e., X and y, for fitting and prediction purposes.
#defining X and y
X = df.drop(['target'], axis=1)
y = df['target']
Now, we can move to testing and fitting an algorithm, then exporting the model and registering it to the Model Registry.
Model Extraction and Registration
For the first version, I want to fit a KNeighborsClassifier to fit the data. Additionally, I will use StratifiedKFold cross-validation to perform multiple train-test splits.
After fitting our model, we will extract it with the Joblib library and finally get it registered in the Model Registry.
from sklearn.model_selection import cross_val_score
from sklearn.neighbors import KNeighborsClassifier
from sklearn.model_selection import StratifiedKFold
from numpy import mean
from joblib import dump
from comet_ml import Experiment
import comet_ml

#initializes a project named "model_tracking"
comet_ml.login(project_name="model_tracking")

#Algorithm of choice
model  = KNeighborsClassifier(n_neighbors=3)

#Training using Stratified K-fold cross validation
def cross_val_eval(model, X, y):
    cv = StratifiedKFold(n_splits=5, shuffle=True, random_state=5)
    cv_scores = cross_val_score(model, X, y, cv = cv, scoring='accuracy', n_jobs=-1, error_score='raise')
    return cv_scores

cv_scores = cross_val_eval(model, X, y)
print(mean(cv_scores))

#fitting and then extracting model
model.fit(X, y)
dump(model, 'model.joblib')

#Logs model experiment to the project
experiment = Experiment()
experiment.log_model("model1", "model directory within the computer")

experiment.end()
The above model gives us an accuracy of 95.3%.
Note that the first line of code (comet_ml.login(project_name = “model_tracking”)) in our Jupyter Notebook will cause the following to appear on your Project page on our browser:

Our project is on the right side in the image above. We can also see that it states there is one experiment in there. The next step is to take said experiment’s directory after opening the project by clicking “View Project”.

After clicking the project and cycling to the “Experiments” tab, we can then see the name that it has been assigned and we can click on it.

After selecting our experiment, intact_silo_3082, we can now copy the path to this experiment (see the top section that is immediately below Comet’s logo in the image above).
It reads mwanikinjagi/model_tracking/intact_silo_3082 on my page and this is what I will use to register a model into the model registry. To do this, I will use the code below:
from comet_ml import API

api= API()
#We feed the experiment in the get() method of the api
experiment = api.get("mwanikinjagi/model-tracking/intact_silo_3082")
#finally registers with given name you have chosen
experiment.register_model("model1")

Now, we have our model1 (it could use a more intuitive name) and we have been provided with a default version number 1.0.0. You have now successfully registered the first version of your model and can find it in the Model Registry.

When we select “View model,” it takes us to a page that allows us to do more with the model. For instance, if working with teams then one could download the different versions of the model from that central point.

Wrap up
In this first part, we have been able to set up our model in the Model Registry. It may have seemed difficult initially but it’s actually very straightforward.
In the next part, I will take you through dealing with different versions of models with a simple example project like the one we have taken up there.

